Archive for the ‘Desktop – Workstation’ Category
Description of ‘Desktop – Workstation’ Category: Posts primarily dealing with the health/maintenance of desktop computers.
Friday, July 30th, 2010
 Hey, everyone. It’s Josh from Computer Fitness yet again. We are a Tech Support Company for Small and Medium businesses located in Reisterstown, MD. Hey, everyone. It’s Josh from Computer Fitness yet again. We are a Tech Support Company for Small and Medium businesses located in Reisterstown, MD.
It’s 2010 and one monitor just won’t cut it anymore. That’s the reality for a lot of computer users these days. Graphic designers and a plethora of other people need more than just one monitor to prevent data overload and clutter. It’s the same thing as having too many files on your desk. You buy a return with some drawers to the side to add a little space and keep things more organized. Others use a second monitor for entertainment, such as hooking up your laptop to a TV. This is useful when streaming TV shows from, let’s say, Hulu. Configuring your system to work with this is pretty simple, and the rewards can be pretty cool. Here’s a walkthrough for getting a secondary display attached to your PC or Mac.
PC
- Check to make sure your graphics card has two outputs
- Laptops just use the VGA out port
- Desktops will require a special card if no second output is present
- Power down
- Connect second monitor
- Power on the machine
- If it doesn’t auto detect, right click on desktop
- Select Properties
- Go to change your resolution
- You should see a second monitor in a little window there, and it may be grayed out
- Click on it
- Then check the “Extend My Windows Desktop onto this Display” box directly beneath the monitor diagram
- Click OK
Mac OS
- Plug in the secondary monitor
- Should auto-detect
- Click “System Preferences”
- Open “Displays”
- It will display this window on both monitors
- Will either automatically mirror your existing desktop or extend it
- In this setting panel, choose how you want it to look
- Optional: Enable “Show Displays in Menu Bar”
- Great option if you are frequently hooking up your computer to a TV or any other external display
-Josh
Computer Fitness

Tags: desktop, display, functionality, Laptop, monitor, pc, second monitor
Posted in Desktop - Workstation, Mac and PC, Monitor / Display | No Comments »
Friday, July 16th, 2010
 Hey, everyone. It’s Josh from Computer Fitness again. We are a Tech Support Company for Small and Medium businesses located in Reisterstown, MD. Hey, everyone. It’s Josh from Computer Fitness again. We are a Tech Support Company for Small and Medium businesses located in Reisterstown, MD.
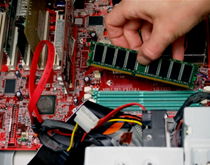
So you want to build your own PC, huh? It’s an admirable goal to be sure. No more dealing with tech support and no wondering about the quality of the craftsmanship. It will be your machine. That’s all well and good, but building a PC isn’t something you want to rush into. It takes time to make sure you have all the details sorted out and the right parts required for successful assembly. Here are some suggestions for your journey to building a PC.
1) Check the dimensions of your parts – It happens all the time. People will buy a lot of parts that look cool, only to realize they don’t fit in the case they bought or that their screaming new graphics card takes up 4 spaces.
2) Double and Triple Check Socket Types – This is an especially important factor. When you purchase your CPU, make sure that it will work with your motherboard. AMD chips won’t work with an Intel motherboard, and vice versa.
3) RAM Speed – RAM comes in many flavors. First of all, make sure you get Desktop sized RAM not notebook RAM. It’s an easy mistake to make. Second, make sure that the speed matches your system. There are a variety of speeds out there, so get the right one for your system to ensure optimal performance.
4) Power Supply – This often gets overlooked. The power supply literally controls how much energy your PC can handle. If you plan on building a gaming PC or a graphic design PC that will utilize powerful hardware, don’t skimp on the power supply. Otherwise, you may find yourself unable to boot up the awesome machine you’ve just built.
-Josh
Computer Fitness
Onsite and Remote Tech Support

Tags: Building PCs, CPU, Parts, pc, power supply, RAM, tech support
Posted in Desktop - Workstation | No Comments »
Wednesday, June 23rd, 2010
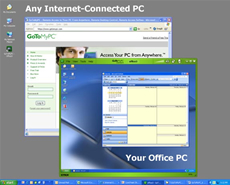 As seen at https://www.gotomypc.com/corp/technology.tmpl June 2010 Hey, everyone. It’s Josh from Computer Fitness again. We are a Tech Support Company for Small and Medium businesses located in Reisterstown, MD.
As we’ve talked about on one of our other blogs, remote use of a computer is a growing trend in today’s IT world. The article, located here, talks about some of the reasons why using RDC is a great idea. Here at Computer Fitness, we’re going to take a look at how to get this up and running on your home machine.
I’m going to assume that you’re using Windows for this part. Mac OS comes next. First, open up your Start menu. Next, you want to right click on My Computer. Next, click Manage. This will bring up a new screen with a lot of details about your computer. If you are using Windows XP, which a lot you probably are, you’ll see a tab labeled Remote.
On the Remote tab, there are two check boxes. The one you want to check here is under Remote Desktop and labeled “Allow Users to Connect Remotely to this Computer”. This computer can now be accessed remotely. If you want to add users that are allowed to use this privilege, which I recommend, just click the box labeled Select Remote Users. That will keep a tight control on the people using it.
Now, for Mac Users. This is pretty easy. Open up your System Preferences. Now, click on Sharing. Once that loads, you will see a number of options for sharing. Things like File Sharing will likely already enabled. You want to check the box labeled “Remote Management”. Once you do, you will be presented with a list of options for users taking control of the system. This provides granular control over users. This way, even if someone gets into your system, you still have some control if you aren’t there. Check the appropriate boxes and hit okay. As with Windows, you can select certain users to give access.
-Josh
Computer Fitness
Onsite and Remote Tech Support

Tags: computer, control, mac, pc, remote, sharing, tech support, users
Posted in Desktop - Workstation, Mac and PC | No Comments »
Thursday, May 20th, 2010
 Hello and welcome to Computer Fitness’ Blog! My name is Josh. You may know me from the Internet Beacon. We have a pretty cool blog over there. If you’re new to our sites, do check it out; there’s plenty more awesome over there. Computer Fitness is a tech support firm in Finksburg, MD. Our areas of expertise run the gamut from workstation repair to server maintenance. Hello and welcome to Computer Fitness’ Blog! My name is Josh. You may know me from the Internet Beacon. We have a pretty cool blog over there. If you’re new to our sites, do check it out; there’s plenty more awesome over there. Computer Fitness is a tech support firm in Finksburg, MD. Our areas of expertise run the gamut from workstation repair to server maintenance.
For the most part, we all take pretty good care of our computers. We make sure the screens are free of spots, sometimes wipe down the keyboard and mouse, and generally make sure we don’t spill coffee in that cup holder thing that comes out of it. However, there may be a vital area you are missing in your attempts to keep your system clean: the inside. I know what you’re thinking, “Why would the inside of my computer be dirty? It’s not like I open it.” Well, that’s a logical assumption. However, it’s incorrect.
The best way to keep your computer cool while it’s working hard while you’re working hard…or playing games on your desk…is through fans strategically placed on the case. They are located at different places on most laptops, but desktops are our focus today. As with all fans, they exchange air at a rapid rate to keep things cool. Because of this, dust builds up. And unbeknownst to you, inside of your computer case could be the secret location of every dust bunny ever conceived by human clutter. Fear not, you can prevent this.
Opening your PC case is not something I recommend if you have an IT department or even an IT guy/gal at your work. They will not want you opening your case for a myriad of reasons. This is for your home PC. If you have permission from your IT people, then feel free to do this at work, too. However, please don’t assume you can open it up. This has caused many headaches for techs all over the world. Also, and this is important, TURN THE COMPUTER OFF BEFORE PROCEEDING. Sorry, I got carried away for a second.
Anyway, to open your case, most computers have two screws on the back side of the case. They are often big enough for your thumbs to turn, and they will let you open up your computer. Inside, you may either find a pristine Eden or a dust-covered wasteland…or somewhere in between. If it leans more towards the latter, then grab a can of compressed air and lightly spray the area inside to get the dust out. Make sure to read the back of the can to use it properly. Also, pay attention to the fans, as they may have some build-up from keeping your PC cool while you play Quake at 3 AM.
Once you’re finished, just close the case back up and turn on the machine. You shouldn’t have any problems and you may even notice the disappearance of some minor background noise from your machine, though this is not guaranteed. That’s all for now. Your PC should be as clean inside as outside, so make sure to perform this maintenance once every few months.
-Josh
Computer Fitness
Onsite and Remote Tech Support

Tags: case, computer, inside, pc, pc case
Posted in Desktop - Workstation, Hardware Overview | No Comments »
Thursday, May 13th, 2010
 Retail box Microsoft Windows 7: Home, Professional, and Ultimate Hello and welcome to Computer Fitness’ Blog! My name is Josh. You may know me from the Internet Beacon. We have a pretty cool blog over there. If you’re new to our sites, do check it out; there’s plenty more awesome over there. Computer Fitness is a tech support firm in Finksburg, MD. Our areas of expertise run the gamut from workstation repair to server maintenance.
Windows 7 is, in my opinion, the best Microsoft OS (operating system) yet. While it may look similar to Vista in some respects, the functionality and overall operability of Windows 7 is miles ahead of its forerunners. Given that all new machines are shipping with Windows 7, I though it appropriate to go over some neat tips and tricks for the OS. Some are cosmetic and some are functional.
Resizing Windows
I know the ability to change the size of a window to your liking is nothing new. In fact, it’s been around since, I believe, Windows 3.1. However, Microsoft introduced a rather cool new feature that automatically resizes them for you with either a mouse gesture or a keyboard shortcut. With this feature, you can either drag the window you want resized to a side of the screen or you can press the Windows key and the direction you want it go. By doing this, the window will take up whatever half of the screen it’s been sent to, allowing you to manage your desktop space even better than before!
Program Stacking in the Task Bar
It’s no secret that those of us who run a lot of programs on our PCs have our task bar filled up pretty quickly. Before you know it, it’s cluttered with a thousand and one Internet Explorer windows and you can never remember which one has what you really want on it. To remedy this, Microsoft changed the task bar. Now, instead of seeing a rectangle with the name of the program running, you see the icon with an illusion of stacking. That way, if you have multiple instances of the same program running, you can mouse over and see a preview of all the windows it uses. This makes it easier to get around your PC, and provides a cleaner look.
All in all, Windows 7 has added a lot of cool features, both behind the scenes and on the user interface. I highly recommend it for anyone looking to upgrade. NOTE: You cannot upgrade from XP to Win7. You will have to format your hard drive and then do a clean install. If you are unfamiliar with this, please consult an IT professional before beginning.
That’s all for this week! We’ll see you back next time for more Computer Fitness tips.
-Josh
Computer Fitness
Onsite and Remote Tech Support

Tags: computer, microsoft, task bar, tech support, Windows, Windows 7
Posted in Desktop - Workstation | No Comments »
Thursday, May 6th, 2010
 Hello and welcome to Computer Fitness’ Blog! My name is Josh. You may know me from the Internet Beacon. We have a pretty cool blog over there. If you’re new to our sites, do check it out; there’s plenty more awesome over there. Computer Fitness is a tech support firm in Finksburg, MD. Our areas of expertise run the gamut from desktop repair to server maintenance. Hello and welcome to Computer Fitness’ Blog! My name is Josh. You may know me from the Internet Beacon. We have a pretty cool blog over there. If you’re new to our sites, do check it out; there’s plenty more awesome over there. Computer Fitness is a tech support firm in Finksburg, MD. Our areas of expertise run the gamut from desktop repair to server maintenance.
Let me begin with this, playing around in the registry is a terrible idea if you don’t know what you’re doing. You can do an incredible amount of damage to your system, perhaps irrevocably damaging it, if you start making changes here. Now that the warning is out of the way, let me give you a brief rundown of what the Registry does.
The registry is a part of the Windows operating system in which files and system settings are stored in a list. Some of the settings are edited with Control Panel. This is to prevent you from having to dig around in the Registry to change the simple things. However, they are all tied into the Registry.
The registry is formulated as a tree, so there are items are expandable to get to more settings. In this sense it is granular. You can get to very specific items. However, this also means navigating through this item can be tricky. Again, messing around in here is not something to do unless you have a great understanding of what can be done here.
The reason I bring this up is because sometimes viruses and malware will create items in here. Because of this, it is important to make sure that whatever anti-virus software you use will need to scan the registry. The software will do this for you, so there’s no need to get into this one your own. For those more in the know, here is a link to some tips from Microsoft.
That’s all for this week. Come back again for more Computer Fitness tips.
-Josh
Computer Fitness
Onsite and Remote Tech Support

Tags: Antivirus, microsoft, Registry, User Beware, Windows
Posted in Desktop - Workstation | No Comments »
Thursday, April 22nd, 2010
 Hello and welcome to Computer Fitness’ Blog! My name is Josh. You may know me from the Internet Beacon. We have a pretty cool blog over there. If you’re new to our sites, do check it out; there’s plenty more awesome over there. Computer Fitness is a tech support firm in Finksburg, MD. Our areas of expertise run the gamut from desktop repair to server maintenance. Hello and welcome to Computer Fitness’ Blog! My name is Josh. You may know me from the Internet Beacon. We have a pretty cool blog over there. If you’re new to our sites, do check it out; there’s plenty more awesome over there. Computer Fitness is a tech support firm in Finksburg, MD. Our areas of expertise run the gamut from desktop repair to server maintenance.
Windows User Account Control, or UAC, was introduced in Windows Vista as a way to make the Windows OS more secure. There are a lot of arguments as to whether or not this is true, but the fact remains that it is a part of Windows. Today, let’s examine some of the Pros and Cons of using UAC.
Pro – UAC Prevents Unauthorized Installations and Changes to Your System
UAC does its job here. It will keep changes from happening to your system without your express permission. This includes changing settings on your machine as well as installing software. This is incredibly handy, as a lot of malware gets around computers this way.
Pro – Adjustable Levels of Access
UAC allows you to set varying levels of warning for your computer. This comes in handy if you are always installing new programs or making changes to your PC. You can custom tailor notifications from the UAC in the Control Panel.
Cons – UAC Can Be Intrusive
One of the biggest complaints that users have about UAC is that it can be incredibly intrusive. This was more of a complaint in Windows Vista, but it is valid. Most people don’t know how to change the settings that control UAC, so getting a notification every time you want to do a lot of things on your PC can be very frustrating.
Cons – Too Specific
UAC’s biggest flaw is that it is too granular. The specificity that UAC applies to computer management is more of a hassle than a help. You can unblock one application but a process started by that application may be flagged. This leads to a lot of frustration and unnecessary action on the user’s part when dealing with UAC.
That about wraps up our section on Windows UAC. There is a lot more to this feature and I encourage you to check out more for yourself (see Windows UAC).
-Josh
Computer Fitness
Onsite and Remote Tech Support

Tags: Information Security, Tips, UAC, Windows
Posted in Desktop - Workstation | 1 Comment »
Thursday, April 15th, 2010
 Hello and welcome to Computer Fitness’ Blog! My name is Josh. You may know me from the Internet Beacon. We have a pretty cool blog over there. If you’re new to our sites, do check it out; there’s plenty more awesome over there. Computer Fitness is a tech support firm in Finksburg, MD. Our areas of expertise run the gamut from desktop repair to server maintenance. Hello and welcome to Computer Fitness’ Blog! My name is Josh. You may know me from the Internet Beacon. We have a pretty cool blog over there. If you’re new to our sites, do check it out; there’s plenty more awesome over there. Computer Fitness is a tech support firm in Finksburg, MD. Our areas of expertise run the gamut from desktop repair to server maintenance.
Mac Owners
Not to sound biased, but I love the Mac OS. Okay, that sounds a little biased. Anyway, Mac users have it easy in a lot of areas and this is one of them. If you are using an Apple computer with Mac OS 10.5 or later, which is Leopard/Snow Leopard, then you have a nifty tool called Time Machine.
Similar to the way a real time machine works, you can revisit the past status of your hard drive with this device. It is installed on your system automatically and can be accessed by going to your system settings and clicking the link for Time Machine. All you need is an external hard drive that is at least as big as your computer’s hard drive. You tell it to enable Time Machine, select the drive you want to use, and it will begin the backup. Bear in mind, this will take a while to complete, so don’t turn off your computer or unplug the external hard drive. You are free to use your computer while this goes on, but you might see a dip in performance.
PC Users
Sorry to break it to you, PCs, but this process is a bit trickier for you. Your version of Windows may have this installed already, but if you are a home user, odds are it does not. Below is a link to the Microsoft site on backups in Windows. If your version of Windows does not have this feature installed, you will have to install software on your own to get this functionality. You can get this at your local computer store, like Best Buy. The processes will vary by manufacturer and so are too much for one blog post.
http://www.microsoft.com/windows/windows-vista/features/backup.aspx
That’s all I’ve got for this week! If you own a Mac, you have no excuse to miss out on this feature!
-Josh
Computer Fitness
Onsite and Remote Tech Support

Tags: backup, mac, pc, time machine
Posted in Desktop - Workstation | No Comments »
Thursday, April 8th, 2010
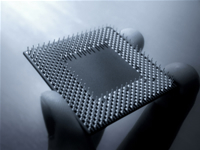 Hello and welcome to Computer Fitness’ Blog! My name is Josh. You may know me from the Internet Beacon. We have a pretty cool blog over there. If you’re new to our sites, do check it out; there’s plenty more awesome over there. Computer Fitness is a tech support firm in Finksburg, MD. Our areas of expertise run the gamut from desktop repair to server maintenance. This week I’d like to talk about processors. Hello and welcome to Computer Fitness’ Blog! My name is Josh. You may know me from the Internet Beacon. We have a pretty cool blog over there. If you’re new to our sites, do check it out; there’s plenty more awesome over there. Computer Fitness is a tech support firm in Finksburg, MD. Our areas of expertise run the gamut from desktop repair to server maintenance. This week I’d like to talk about processors.
Sure, it sounds cool, but does it really benefit you? Companies love to tout the latest and greatest technological advances. They tell you that you need their products and that without them, your computer will be drastically slower. This is partially true. Yes, these processors can be considerably faster, but only in specific circumstances. The number of cores on a processor really reflects how much it can do and the amount of processors on the chip. For example, a quad-core processor has four processors on one chip.
This means it can do drastically more than an older, singe core processor. However, the biggest bonuses will be noticed in programs that are designed to take advantage of these processors. A great example of this is new operating systems for Apple and Microsoft. Windows 7 and Mac OS 10.6 (Snow Leopard) operate in what is called “64-bit” mode. This means that the amount of memory they use is greater, but it affords faster processing.
At the end of the day, you need to determine if you really need the processing power these chips offer. In my off time, I play games on my PC, so getting a faster processor for the latest games makes sense to me. However, if you are simply doing word processing and basic Internet use, then paying for this extra perk is not worth it.
Well, that’s all I have for you this week. Thanks for stopping by.
-Josh
Computer Fitness
Onsite and Remote Tech Support

Tags: computer, faster, processing, processor, Processors
Posted in Desktop - Workstation, Hardware Overview | No Comments »
Thursday, April 1st, 2010
 Hello and welcome to Computer Fitness’ Blog! My name is Josh. You may know me from the Internet Beacon. We have a pretty cool blog over there. If you’re new to our sites, do check it out; there’s plenty more awesome over there. Computer Fitness is a tech support firm in Finksburg, MD. Our areas of expertise run the gamut from desktop repair to server maintenance. This week, I’d like to talk about knowing if your PC is infected by malware/viruses. Hello and welcome to Computer Fitness’ Blog! My name is Josh. You may know me from the Internet Beacon. We have a pretty cool blog over there. If you’re new to our sites, do check it out; there’s plenty more awesome over there. Computer Fitness is a tech support firm in Finksburg, MD. Our areas of expertise run the gamut from desktop repair to server maintenance. This week, I’d like to talk about knowing if your PC is infected by malware/viruses.
Get With the Program
A huge sign that your computer has been infected is seeing programs running that you don’t recognize. This is not to say that you should go deleting everything you see that doesn’t instantly ring a bell. However, if you don’t remember installing “NO VIRUZEZ LOLZ” and it keeps popping up when you start the computer, you’re likely infected.
Can You Sign this Form?
Programs that persistently ask you to register/buy a full product are not uncommon. Many people download demos of software to get a feel for them. These demos usually ask you to buy the full version, so this is not irregular. However, when coupled with the previous point about recognizing software, this can be a sign that your PC is sick. Unless you specifically know what the software is and where your money is going, don’t give them any personal information.
Things Are a Bit Slow Around Here
Decreased computer performance happens, as machines get older. However, if you notice a sudden, drastic drop in performance, then it is likely that your PC is infected. A lot of malware eats up resources on computers without doing anything else. They are there to annoy you and that’s what they will do. As with any other malware or virus, a good computer security bundle will do wonders. I recommend Trend Micro Internet Security Pro. It covers all your bases and runs smoothly.
That’s it for this week. We’ll see you next time!
-Josh
Computer Fitness
Tech Support

Tags: pc, Trend Micro, virus
Posted in Desktop - Workstation | No Comments »
|
 Hey, everyone. It’s Josh from Computer Fitness yet again. We are a Tech Support Company for Small and Medium businesses located in Reisterstown, MD.


